Archive for the '3D projects' Category

Trimming The Town Split-Panel Card

Published by under 3D projects

Trimming The Town - Split Panel Card by Simone Bartrum

Welcome to this week’s project for The Spot Creative Challenge. Our challenge this time is to create a project using our favourite fun fold.

What an awesome theme!

I have a few fave fun folds, but my ultimate (at the moment lol) is the SPLIT PANEL CARD. I’ve shared a few of these in the past – and you can find a couple here in the portrait orientation.

For this card I decided to turn the card in its side – literally – and try a landscape version.

Trimming The Town - Split Panel Card by Simone Bartrum

The card base is Misty Moonlight cardstock, with the bottom and top panels 4cm high each.

The gap is joined by the house and tree, which were both cut from the Trimming The Town designer series paper using the coordinating Home Together dies.

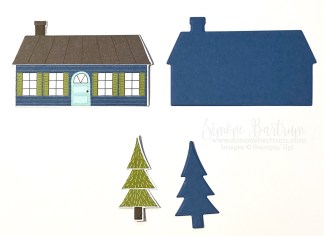
To make them more sturdy I cut an extra piece from Misty Moonlight cardstock and adhered them together.

For a little bit of extra dimension, I cut an extra roof (from another house), scored along the roof lines and raised it up on Stampin’ Dimensionals. For a giggle, I added a little piece of tissue paper poking out from between the chimney layers to look like smoke.

The sentiment was trimmed from an amazing sheet of paper from the same Trimming The Town pack. It has loads and loads of sentiments in different languages.

I cut out the English ones to use on projects and was totally blown away by the variety! One of these little sentiments were the perfect fit for my card.

And finally, to finish the card I did a little stamping and colouring with Old Olive Stampin’ Blends.

Split Panel Card (inside)

In this photo above, you can see how backing the house and tree with cardstock (to make them more sturdy) had the added benefit of allowing them to blend in when the card is open.

So there you go! My favourite fun fold card. I hope you like it!


About THE SPOT CREATIVE CHALLENGE:

Each week our Design Team of international creatives share projects based on a new challenge. It could be a sketch, a technique, a colour challenge or – as it is in this week – a theme challenge.

Each Tuesday at 9pm (Syd/Mel time) you’ll see a new challenge post on the challenge website (click to visit). You can play along, and if you want you can even enter your card in the weekly challenge by uploading your project (and you don’t even need a blog!).
A winner will be chosen each week.


Your Challenge

So now it’s your turn. Think of your favourite fun fold card and make it with different stamps or papers. When you’re finished, jump over to The Spot and upload a photo of your project. Have fun!

Happy stamping, 

Simone Bartrum, Stampin' Up! demonstrator Australia, Victoria
Join me on Facebook at https://www.facebook.com/StampingWithSimone/

2 responses so far

Sketch Challenge [The Spot #125]

Published by under 3D projects

Welcome to this week’s project for The Spot Creative Challenge. This week we have a sketch challenge!

If you ever find yourself stuck for inspiration, sketch challenges are fantastic. I highly recommend collecting a few different sketches and keeping them on hand for when you need that little idea to get you started on a new project.

I decided to mix things up by using the sketch to decorate the top of a !

The sides of the box use the brushed metallic gold paper. I wanted to tint it with , but of course the ink just rubbed off. My solution was to ‘distress’ the metallic paper with sandpaper to rough it up and expose some of the white core. Wiping it over with an inked sponge finished it off.

About THE SPOT CREATIVE CHALLENGE:

Each week our Design Team of international creatives share projects based on a new challenge. It could be a sketch, a technique, a colour challenge or – as it is in this week – a theme challenge.

Each Tuesday at 9pm (Syd/Mel time) you’ll see a new challenge post on the challenge website (click to visit). You can play along, and if you want you can even enter your card in the weekly challenge by uploading your project (and you don’t even need a blog!).
A winner will be chosen each week.


Your Challenge

So now it’s your turn. Use the sketch that you see at the top of this post, and use it as inspiration for a project of your own. You don’t have to follow it exactly – for example, feel free to change the circle to a different shape. When you’re finished, jump over to The Spot and upload a photo of your project. Have fun!

Happy stamping, 

Simone Bartrum, Stampin' Up! demonstrator Australia, Victoria
Join me on Facebook at https://www.facebook.com/StampingWithSimone/

No responses yet

Tutorial: New Scalloped Tag Topper Box

Published by under 3D projects

Hi friends,

Following on from my post last week, I played around with Jacquie’s Scalloped Tag Topper Punch Box and made a couple of modifications.

I wanted the new box to have flaps on the inside, so the box was more ‘closed’ on the sides.

This is the new creation…

Alt Scallop Tag Topper Box

How to create this version:

1. Cut card stock to 4 ½” x 7 ¾”. You can comfortably get two boxes from one A4 sheet.

2. Score short side at 1¼ and 3 ¼.

3. Turn and score long side at 1¼, 3 ¼, 4 ½ and 6 ½.

4. Remove two corners and cut along the score lines as shown on the first template above.

Hope you can see the pic clearly enough. Let me know if you can’t and I’ll add a better shot.
Tip: You can cut the score lines in different ways to create the tabs but this layout worked well for me because it added extra strength to the sides while still looking neat on the inside when the lid was raised. 

5. Slide one of the three flaps over the guide of the Scalloped Tag Topper punch, and then push it right inside.  Punch the decorative edge. It’s a tight fit, and takes a little wiggling – that’s the technical term – but it does work. Repeat for the other two flaps.

6. Decorate! Go wild.

5. Add Tombow adhesive or Sticky Strip to the shaded areas as shown on the second template above. Assemble box.
Tip: The two side flaps go IN the box, and the front one goes on the outside.

6. With the lid closed, make a little pencil mark to show where the brad needs to go. Add brad. The brad not only keeps the lid closed, but it also acts as a reinforcement because it is going through three layers of card stock. No chance the box will come apart. 😉

Note: If you want to make the box I shared in last week’s post then follow steps 1 to 3 above, but remove the side flaps. Thanks again Jacquie Bell for the inspiration! Oh, and I know it’s kinda obvious but for the kids out there: don’t light the candle while it’s in the box. LOL. The box is for decoration only.

Alrighty, I hope you have lots of fun making these. Don’t forget to leave some comment love and let me know what you think.

Happy stamping,

Simone Bartrum, Stampin' Up! demonstrator Australia, Victoria

25 responses so far