Tutorial: Creating Rhinestone Gems from Stampin’ Up! brads

Published by under cards | Feb 03 2010


Sale-a-bration Stamp Sets

Have you ever wanted to add embellishments to one-layer cards, without it ruining the look on the inside?

I really wanted to add some bling to these simple, clean cards but I didn’t want the pins from the brads to show on the inside. With multi-layer cards it’s easy… you just add the brads to the top layer only, and then attach that layer to the card base. Problem solved. You can’t do that with one-layer cards though.

Today I’m sharing a trick that’s been around for ages, but it is sure is a beauty. Simply grab a Stampin’ Up! brad (the Fire and Ice circle and square brads look fantastic), and follow the steps below to extract the gem.

Step 1

STEP 1.

Choose a Rhinestone Brad
(p149 Idea Book & Catalogue)


Step 2

STEP 2.

Pull the pins (legs) apart to expose the back of the brad
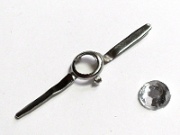


Step 3


STEP 3.

Using a sharp tool (hobby knife or the ends of your scissors), pry open the two clasps holding the rhinestone brad


Step 4

STEP 4.

The rhinestone should come out quite easily, but you might have to give it a gentle push. Be careful not to scratch the front of the gem with your blade.


STEP 5.

Push the gem onto a Mini Glue Dot (p154 IB&C).


Your gem is now ready to use.


Bling Close Up


Happy stamping,


One response so far

One Response to “Tutorial: Creating Rhinestone Gems from Stampin’ Up! brads”

  1. jenny myerscoughon 03 Feb 2010 at 10:51 pm

    Great tip and great pictures on what to do.

Trackback URI | Comments RSS

Leave a Reply

  • Stampin' Up! 2025-2026 Annual Catalogue
    6 May 2025 - 4 May 2026
    View Online | Shop Online
  • Join to save money or join to make money!

  • Join to save money | Join to make money
  • Amazing places we've visited thanks to Stampin' Up!'s Incentive Trip program*

  • Mediterranean Cruise 2016
  • * Legal disclaimer: I have achieved the awards and recognition listed above, but this is not representative of typical Stampin’ Up! demonstrators. The level of sales to achieve this result requires significant work and is accomplished by a substantially small percentage of Stampin’ Up! demonstrators.


  • Popular Posts

  • The Fine Print

  • All content, including designs, concepts, text, and photographs are COPYRIGHT ©2025 Simone Bartrum, unless otherwise stated. I only use Stampin' Up!® products, so all stamped images are COPYRIGHT 2025 Stampin' Up!. As an independent demonstrator for Stampin' Up!, the content of this site is my responsibility. The use of and content of the classes, services, or products offered on here is not specifically endorsed by Stampin' Up!.