For all your
Stampin' Up!®
papercrafting needs,
Australia wide

How to Make Adhesive Glitter Shapes

Published by under Big Shot,cards | Apr 22 2011

Ever wish you could add glitter to your projects in the shape of your favourite Sizzix dies

You can with the new Big Shot Multipurpose Adhesive Sheets (available now in the Autumn-Winter mini catalogue, #120805).


Today's pictorial tutorial shows you how!


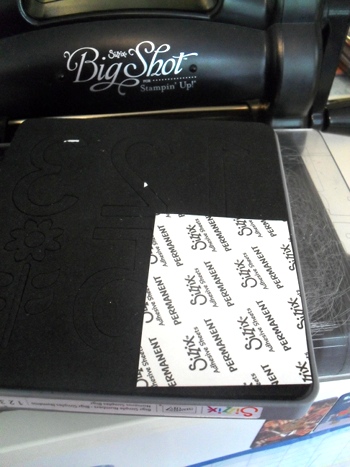
Step 1. Grab an adhesive sheet. They come in packs of 12 sheets, each a full 12"x12".


Step 2. Cut a piece from the adhesive sheet to the required size.

In our sample I just need the number 4 from this die (it's part of the Simple Numbers set of dies). I don't want to waste any of the adhesive sheet by cutting numbers I don't need.


Step 3.  Place the adhesive sheet on your die with the printed side FACE UP.

This isn't a big deal if you are cutting something that is reversible (such as a flower or the number 0) but is very important for me cutting out the number 4. Why? Because the printed side is the backing paper which will be removed to expose the adhesive, which will then go face down on your project. If you forget this step your letter or number will be back to front! Trust me, this will make sense later on.


Step 4. Crank it through Mr Big.


Step 5. Remove backing paper (the printed sheet) to expose adhesive


Step 6. Adhere the sticky diecut to your project


Step 7. Press firmly all over the surface of the die cut.

This will ensure that the adhesive transfers from the backing paper onto your project. I like to use my trusty bone folder for this step.

Rub rub rub, then peel off the backing layer.


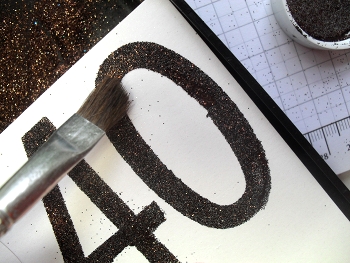
Step 8. Apply glitter.

Sprinkle glitter liberally. Shake the excess back into the glitter container. The Powder Pals trays (p141 IB&C) come in handy here.

Step 9. Brush off the strays.


And you're done! Very sparkly in real life.

Did you know?

You can create your own stickers from precut shapes by simply pressing them onto the Adhesive Sheet and pulling the shape up. Or you can apply card stock or Designer Series Paper to the Adhesive Sheet, run through the Big Shot, peel off the backing paper, and adhere. Great stuff.


Today is Good Friday and also my older sister's 40th birthday. Can't wait to see her on Sunday along with the rest of the family for all the birthday celebrations.

Easter blessings to you,

One response so far

Awning Card

Published by under 3D projects,cards,general chat | Apr 20 2011

We got home from our annual camping adventure today. This is that holiday: no electricity, no running water. Just some of my favourite people in the world, and Mother Nature. 

We love this holiday each year and look forward to it for months… but we also really look forward to the nice hot shower back at home! Funny how the smell of campfire smoke hangs around for so long, doesn't it?!

This trip was even more special because my younger sister and her boys joined us for a few days. And we stamped! My sister is fairly new to cardmaking so we had a great time going through the basics like cutting cardstock, watercolouring and layering. I just wish we'd taken photos of us stamping on trestle tables out in the bush!

But I do have a card to share with you today. I was chatting to a stamping buddy tonight (hi Jenny) and realised I hadn't posted my awning card. I can't remember where I first saw this technique, but this particular card is based on one that fellow demonstrator Tracy Penn gave me.

The Birthday Bakery stamp set is perfect for this card.


Birthday Bakery is one of the exclusive FREE stamp sets for Hostesses (or anyone with a qualifying order). It's such a sweet set! I always partner it with some sparkly Dazzling Diamonds glitter.

The awning is created by adhering 11 punched shapes from the Word Window punch to a strip of cardstock 3.5cm x 10.5cm. The window punchies will overhang at the top and bottom. Adhere to the top of the card front, and bend the bottoms to look like a shopfront awning. Cute!

We made this card at Stamp Club last month, and the clever girls came up with some fabulous themes for other awning cards. How about:

  • zoo (Fox & Friends, Animal Stories)
  • pet shop (D is for Dog, C is for Cat)
  • train station (Choo Choo)
  • fruit shop (Tart & Tangy)
  • a window scene (Lovely As A Tree)
  • baby shop (Baby Bundle)
  • toy shop (Family Favourites)
  • coffee shop (Morning Cup)
  • florist (A Flower For All Seasons)
  • Christmas shop (any of your favourite festive sets)
  • cake shop (Build-a-Cupcake punch)

I also made a chocolate shop with the new Eat Chocolate stamp set from the Autumn-Winter mini catalogue. So many ideas!

Well I'd better stop chatting and get back to the unpacking. Enjoy the rest of your week.

Subscribe to Simone Bartrum, Stampin' Up! demonstrator – Victoria, Australia by Email

One response so far

Test Tube Treats

Published by under 3D projects,easter | Apr 16 2011

I came across these fabulous treats from Chocoholics Anonymous, and straight away had plans for these little babies!

They'll be perfect Easter yummies for my nieces and nephews. How cute would they be decked out in pirate gear for a boy's party…. oh the possibilities are endless.

FYI, because I know somebody will ask! LOL: They're about $3 each and have chocolate 'popping candy' in them (which my kids LUV).  If you want some maybe get in contact with Karen, my lovely Chocoholics Anon consultant, and she'll help you out. Oh and the paper wrapped around the top is from the Nursery Suite Specialty collection from Stampin' Up!

Happy stamping,

No responses yet

  • This is me! Simone Bartrum, Australian Stampin' Up! demonstrator since 2007.
  • Simone Bartrum
    Australia
      0411 642 038

  • Welcome to my online home where I share a love of cardmaking, hand-crafted home decor and rubber stamping. Grab a cuppa and click around!

  • Would you like something you see here? 
    If you're in Australia, come browse my online store.

  • Questions or comments?

  • 2025
    Sales Award Top 10 AU
    Australian Top Performer
    Incentive Trip Achiever

  • 2024
    Sales Award Top 10 AU
    Incentive Trip Achiever
    Team Building Award


    2023
    Sales Award #11
    Team Building Award
    Leadership Award

  • 2022
    Sales Award #13
    Team Building Award
    Leadership Award

  • 2021
    Sales Award #15
    Team Building Award
    Leadership Award

  • 2020
    Australian Top 25
    Sales Award #5
    Incentive Trip

  • 2019
    Australian Top 25
    Sales Award #11
    Leadership Award

  • 2018
    Australian Top 10
    Incentive Trip Achiever
    Top 10 Sales & Recruiting

  • 2017
    Australian Top 10 #6
    Global Top 100
    Incentive Trip Achiever

  • 2016
    Australian Top 10
    Incentive Trip Achiever
    Leadership Award

  • 2015
    Incentive Trip Achiever
    $40K Sales Award
    Recruiting Award

  • 2014
    Leadership Award
    Recruiting Award
    Incentive Trip Achiever

  • 2013
    Leadership Award
    Incentive Trip Achiever
    Sales Achiever's Award

  • 2012
    #2 Leadership Award
    Incentive Trip Achiever
    #6 Demonstrator of Year

  • 2011
    #1 Leadership Award
    Incentive Trip Achiever
    #7 Demonstrator of Year

  • 2010
    #2 Leadership Award
    Incentive Trip Achiever
    #16 Demonstrator of Year

  • FREE TUTORIAL BUNDLE WITH $50 PURCHASE

  • Recent Posts

  • Meta

  • Stampin' Up! 2025-2026 Annual Catalogue
    6 May 2025 - 4 May 2026
    View Online | Shop Online
  • Join Stampin' Up!

  • Join to save money | Join to make money
  • Amazing places we've visited thanks to Stampin' Up!'s Incentive Trip program*

  • Mediterranean Cruise 2016
  • * Legal disclaimer: I have achieved the awards and recognition listed above, but this is not representative of typical Stampin’ Up! demonstrators. The level of sales to achieve this result requires significant work and is accomplished by a substantially small percentage of Stampin’ Up! demonstrators.


  • Popular Posts

  • The Fine Print

  • All content, including designs, concepts, text, and photographs are COPYRIGHT ©2026 Simone Bartrum, unless otherwise stated. I only use Stampin' Up!® products, so all stamped images are COPYRIGHT Stampin' Up!. As an independent demonstrator for Stampin' Up!, the content of this site is my responsibility. The use of and content of the classes, services, or products offered on here is not specifically endorsed by Stampin' Up!.