Oh where does the time go? Here we are barreling along towards Christmas… aren't the days just zipping by?
This weekend we are celebrating my parent's 40th Wedding Anniversary and my son's 10th birthday! We're having a family reunion at the beach and I'm also going to the Melbourne Regional training day for Stampin' Up! demonstrators… so before I carry on the hunt for the missing bucket and spade, I just wanted to quickly stop by and share this fun project.
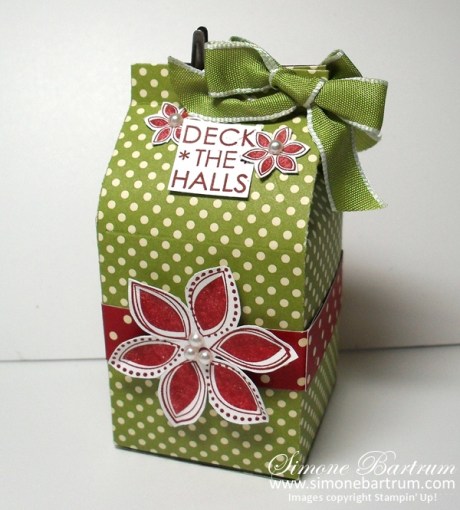
The Mini Milk Carton die (p155 IB&C) was a surprise birthday present I received last week, and it's soooo cute! It creates adorable itty bitty boxes with the Big Shot. These really are small! Only a couple of inches tall BUT there is a nifty little trick where you can fold your paper a couple of times just inside the cutting lines to give the box extra height. The folds can be covered by ribbon or embellishments. A bit difficult to explain, maybe I'll have to do another 'pictorial tutorial' to share here? Let me know if you're interested.
Ooh, and you can fit quite a bit in there if you just fold the top and secure with a mini library clip, rather than sealing it with adhesive.

Stamps used are from Season of Joy, and the paper is Jolly Holiday. Colours are Cherry Cobbler and Old Olive (my fave combo at the moment). The ribbon is from the Mistletoe bundle which is FREE right now with the purchase of any our special bundles.

Happy stamping and have a wonderful weekend,

Tags: Mini Milk Carton die

I spent the past weekend in Canberra with my friends and downlines Melissa and Juliana. It was a combination girls’ weekend/Stampin’ Up! event as we all went to the Canberra Regional training day together too.
Mel was one of the lucky few who won a brand new stamp set from the upcoming Summer Mini catalogue.

Here she is with Sophie Zadeh, the training facilitator from Stampin’ Up!
On the Saturday night we did ‘shoebox swaps’. What’s that, you ask? Well, first of all you have to go shopping and buy a new pair of shoes so you have a shoebox… Only kidding!
(But we did do some serious shopping while in Canberra, and had a few spare shoeboxes by the end of it!)

So with a shoebox swap, each person brings the supplies to make a project (bring enough for everyone) and then you take it in turns creating each other’s project using the supplies in the box.
The great thing about shoebox swaps is that we are all contributing to the craft session, and we all get to make new things too! Mel’s project was the very cool Designer Series Paper tree at the top of this post. It was made by cutting circles of different sizes with the Circle Scissor Plus (p149 Idea Book & Catalogue). Then just fold each circle in half four times to create score lines, then fold along those lines concertina-style. There’s a wooden skewer up the middle of mine.
Mel even supplied the little red bucket and the florist foam for it to sit in. (Thanks Mel – what a hostess!).
When I came home I had the bright idea – well, I thought so at the time – to cover the florist foam with tiny punched out flowers from the Boho Blossoms punch and matching Punch Potpourri stamp set (Level 1 hostess set). But…. do you know how many punched out flowers it takes to cover a fairly small area? Let me tell you, it’s a lot! LOL. But it was a great project to make with Miss 7 who had a little operation today. She’s fine, but needed to stick extra close to her mum today so we had plenty of time to stamp and punch lots… and lots…. and lots of flowers.

I love how the new limited edition Sleigh Bells ribbon goes so well with the Jolly Holiday designer series paper.
Happy stamping,
Tags: jolly holiday

Less than two months until Christmas!
Wooohooo!!! I'm one of those people who love love love Christmas. The decorations, lights, music, family time, yummy food, traditions, homemade cards. I love it all! So I'm especially loving our EurekaStampers team swap this month, which is all about CHRISTMAS! I've been getting beee-uuuu-tiful Chrissy cards in the letterbox throughout October, including this one that just arrived today from Jessica Williams. Isn't she talented?! (Thank you Jess for giving me permission to share this here xx)
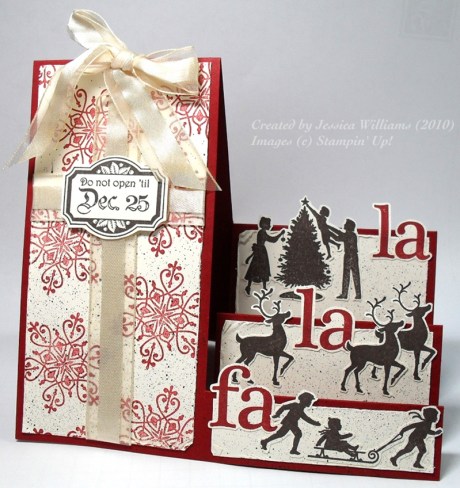
This stunning stair-step card uses the two gorgeous stamp sets on page 26 of the Stampin' Up! Idea Book & Catalogue: Winter Post and Welcome Christmas.
And one more look (check out the tea-dyed organza ribbon)…

I just recently got Welcome Christmas as part of the fabulous bundle promotion that's on this month. I love the limited edition Cocoa Specialty paper that came in the bundle – 12×12 designer series paper that coordinates with Real Red and Soft Suede, and a few sheets even have flocking. Wow, that stuff is so much fun to work with… paper that looks good and feels good too, has got to be a great thing. LOL
I'm still working on my swaps for this month – eek! It's been a crazy time, with the trip to Hamilton Island and since then I've had my head in the books getting all the tax and paperwork up-to-date (I do the book-keeping for my husband's business). Pheww!!! Soooo glad that's over… for now!
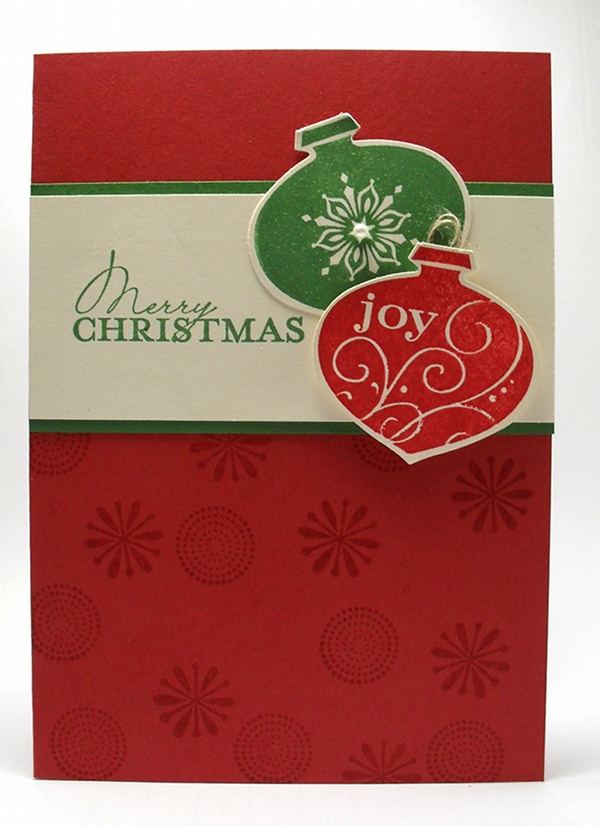
Just wanted to say a quick hello to Narelle and the girls from our workshop this morning [big wave] It was such a fun morning, and what a gorgeous group of girls to spend time stamping with.
We made a Riding Hood Red, Garden Green and Very Vanilla card using the Delightful Decorations bundle, and christmas ornament with stamps and coordinating punches.
 Happy stamping,
Tags: stair step card, welcome christmas, winter post