For all your
Stampin' Up!®
papercrafting needs,
Australia wide

Vintage Style and the ‘Faux Layers’ technique

Published by under cards,Designer Series paper | Sep 14 2010

It's hard to miss the fact that the vintage look is absolutely huge in papercrafting right now, so our topic at Stamp Club this month was creating within this Vintage style. Ageing, distessing (de-stressing to us!), crumpling, spritzing, sponging, sanding. You name it, we did it!

It was an interesting experience for some who were stepping out of their comfort zones (yes you know who you are!), but lots of fun too.
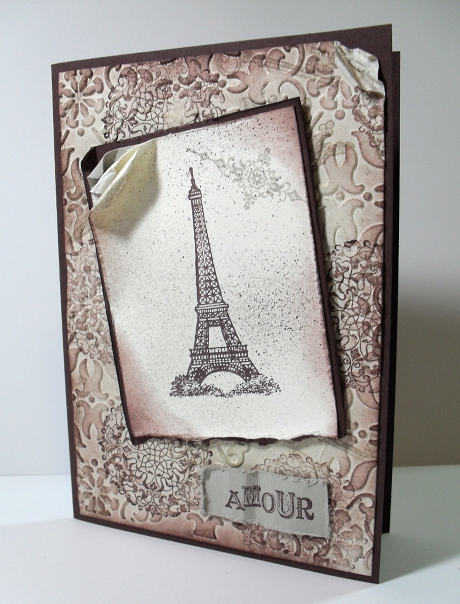
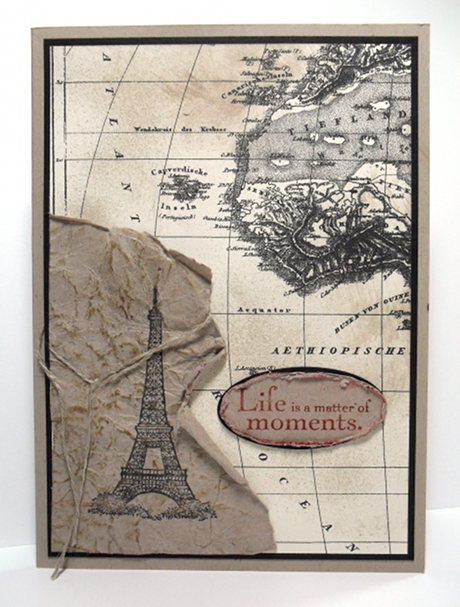
FAUX LAYERS

Distress the corners of the focus layer by curling and rolling the Very Vanilla card between your fingers. After a little while the fibres within the card break down and the layers are easily separated with a scrape of a fingernail.

On our card, the Vanilla piece was to be layered on to Chocolate Chip cardstock, but we wanted to add a hint of Sahara Sand between the two layers. So here's the tip…. simply adhere a piece of Sahara Sand cardstock to the corner only (as a false layer), keeping the adhesive clear of the rolled corners on top. This 'faux layer' is then distressed a little too.

This is a handy technique when you really don't want to add bulk and weight to the card. The touch of Sahara Sand in the corner also helped to balance out where it appeared on other parts of the card too.

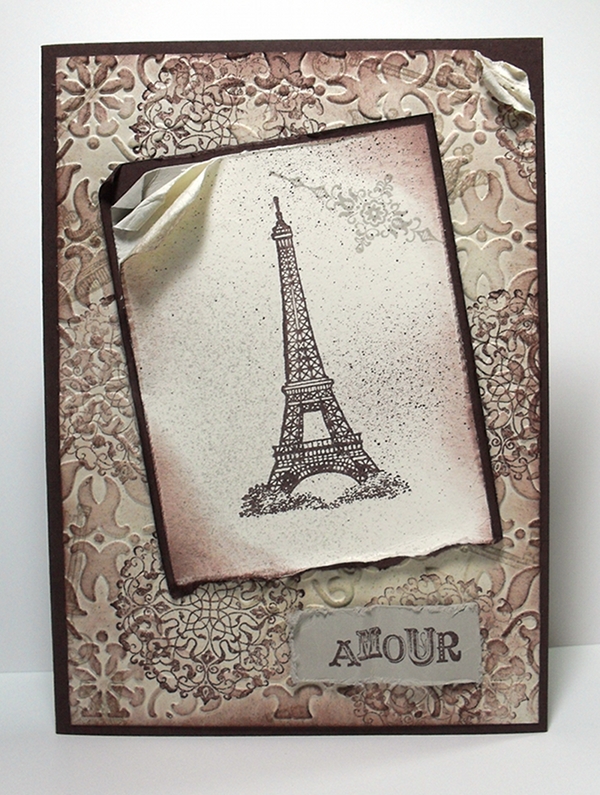
Artistic Etchings stamp set; Chocolate Chip, Very Vanilla and Sahara Sand cardstock and ink, Vintage Wallpaper embossing folder, sponge, spritzer tool, Stampin' Dimensionals.

Speaking of aging (!), today is my 3rd anniversary of being a Stampin' Up! demonstrator. 🙂 I still remember how excited I was when I got my Starter Kit – full of stamps and inks and cardstock that I had chosen! Actually, I'm lucky I get to feel that way whenever a big brown box turns up with new Stampin' Up! goodies in it. Big warm fuzzy hugs to the special friends, team members and customers who've travelled this journey with me and continue to offer their support and friendship. Mwah!

I'll be back later this week with another couple of cards we made at the Stamp Clubs. They were quick, lighthearted projects in the 'Clean & Simple' style (the perfect vintage antidote for those who weren't used to it!) using the new 2-step owl punch and the stunning butterfly Embosslit.

Happy stamping,

3 responses so far

Compliments to the Chef

Published by under cards | Sep 07 2010

One of the great things about attending our Stampin' Up! official functions (like the annual Convention, and regional training days) is getting NEW stamps! At our last Convention in May I was lucky enough to get about 8 new sets for free, and one of them was Compliments to the Chef (you can find it on p98 of the Idea Book & Catalogue). What a fun set for someone who likes to entertain, or even for a budding Masterchef!

Inspired by Alison Okhamitsu (menu)

CASEd from Corinne Sommerville's gorgeous creation.


Contact me if you'd like to order this set, or have a play with it at your own workshop. For more information about workshops, click here.

If you'd like to find out a little more about joining as a demonstrator so you can attend Stampin' Up! events too, click here. Don't forget we have our fabulous promotion during September… join us and you'll get yourself a complete set of "In Colour" products for free (valued at $85), including markers, large ink pads and coordinating cardstock. 

Happy stamping,


One response so far

Totally Tools tips for Fathers Day

Published by under cards,stamping techniques | Sep 05 2010

It's Father's Day today here in Australia, so today's tips are about one of our blokey stamp sets: Totally Tools. There are 5 stamps in this set, each with a different tool and witty sentiment.


Sometimes I like to use my image stamps separately from the words, and although there are a few techniques that enable you to do that quite easily (such as masking), sometimes I like to split-mount my stamps. GASP! Yes, I cut them! It's ok, they don't feel a thing. 😉 

Split mounting simply means that you cut the image and the words apart, so you end up with 2 pieces of rubber stamp not one. The pieces are adhered to different parts of the wood block, so can be used separately.

And yes, I know it would seem like it won't work being stuck on the curvy edge of the block (I thought it wouldn't work too and it was kind of an experiment!),  but it does actually work and the words come out crystal clear. Where possible, I would normally adhere the word to the flat end of the block, but this particular set had very long sentiments.

So now we have 10 stamps for the price of 5!


How to make the tools:


1. Stamp tools with jet black Stazon ink.

2. Colour the images as desired. I used the Basic Gray and Real Red Stampin' Write Markers. Then apply Crystal Effects, our clear craft lacquer which you can find on p144 of the NEW Idea Book and Catalogue (it's only $11.95 for a bottle, and is acid free).

3. Leave your images overnight and then cut them out. Use as handy embellishments on your cards, scrap pages or OTP (off the page) projects.

Crystal Effects looks great on the buttons Sizzlits die-cuts (p152 IB&C), on vase and glass images, as dew drops on leaves and flowers and plenty of other uses too!

Happy stamping,


P.S. Non Stamping Related: A big thank you to so many of you – customers, team members and demonstrator friends – who've contacted me over the past 24 hours about the floods we've had here in our little town. We've very grateful that our house is on high ground so we are ok, but it was a surreal experience seeing our main street totally flooded and heartbreaking knowing that so many people here in our own community have lost everything. 

4 responses so far

  • This is me! Simone Bartrum, Australian Stampin' Up! demonstrator since 2007.
  • Simone Bartrum
    Australia
      0411 642 038

  • Welcome to my online home where I share a love of cardmaking, hand-crafted home decor and rubber stamping. Grab a cuppa and click around!

  • Would you like something you see here? 
    If you're in Australia, come browse my online store.

  • Questions or comments?

  • 2025
    Sales Award Top 10 AU
    Australian Top Performer
    Incentive Trip Achiever

  • 2024
    Sales Award Top 10 AU
    Incentive Trip Achiever
    Team Building Award


    2023
    Sales Award #11
    Team Building Award
    Leadership Award

  • 2022
    Sales Award #13
    Team Building Award
    Leadership Award

  • 2021
    Sales Award #15
    Team Building Award
    Leadership Award

  • 2020
    Australian Top 25
    Sales Award #5
    Incentive Trip

  • 2019
    Australian Top 25
    Sales Award #11
    Leadership Award

  • 2018
    Australian Top 10
    Incentive Trip Achiever
    Top 10 Sales & Recruiting

  • 2017
    Australian Top 10 #6
    Global Top 100
    Incentive Trip Achiever

  • 2016
    Australian Top 10
    Incentive Trip Achiever
    Leadership Award

  • 2015
    Incentive Trip Achiever
    $40K Sales Award
    Recruiting Award

  • 2014
    Leadership Award
    Recruiting Award
    Incentive Trip Achiever

  • 2013
    Leadership Award
    Incentive Trip Achiever
    Sales Achiever's Award

  • 2012
    #2 Leadership Award
    Incentive Trip Achiever
    #6 Demonstrator of Year

  • 2011
    #1 Leadership Award
    Incentive Trip Achiever
    #7 Demonstrator of Year

  • 2010
    #2 Leadership Award
    Incentive Trip Achiever
    #16 Demonstrator of Year

  • FREE TUTORIAL BUNDLE WITH $50 PURCHASE

  • Recent Posts

  • Meta

  • Stampin' Up! 2025-2026 Annual Catalogue
    6 May 2025 - 4 May 2026
    View Online | Shop Online
  • Join Stampin' Up!

  • Join to save money | Join to make money
  • Amazing places we've visited thanks to Stampin' Up!'s Incentive Trip program*

  • Mediterranean Cruise 2016
  • * Legal disclaimer: I have achieved the awards and recognition listed above, but this is not representative of typical Stampin’ Up! demonstrators. The level of sales to achieve this result requires significant work and is accomplished by a substantially small percentage of Stampin’ Up! demonstrators.


  • Popular Posts

  • The Fine Print

  • All content, including designs, concepts, text, and photographs are COPYRIGHT ©2026 Simone Bartrum, unless otherwise stated. I only use Stampin' Up!® products, so all stamped images are COPYRIGHT Stampin' Up!. As an independent demonstrator for Stampin' Up!, the content of this site is my responsibility. The use of and content of the classes, services, or products offered on here is not specifically endorsed by Stampin' Up!.