For all your
Stampin' Up!®
papercrafting needs,
Australia wide

Stampin’ Up! Mini Calendar Project – And a Giveaway!

Published by under cards | Dec 31 2015

How is this possible?

I’m sure 2015 only just got going, and now it’s over.

It takes me longer each year to get the hang of writing the year. Know what I mean? I’ll be signing 2015 right through until May….  Crazy, huh?

Well, I have a little project to share today before we get the champers ready for some Pop Fizz Clink. And a giveaway!


MINI CALENDAR PROJECT

Another great Mini Calendar project. This one uses framelits and dies to create a fridge magnet calendar. Cute! From www.simonebartrum.com


We love getting our mini calendar projects made each year. They make such a cute and economical gift.

This one uses the Lots of Labels framelits to cut out a nice sturdy base from Coaster Board. It’s decorated with some lovely patterned paper and the Spiral Flower die.

Um… back up a minute. Coaster Board?

What is that!

You can find it on page 148 of the annual Stampin’ Up! catalogue or right here in my shop. It’s a fabulous sturdy medium and the perfect thing for this project.

My calendar has a magnet on the back and will be up on my fridge all year so I really need a nice firm base so it doesn’t flop after a few months. Coaster board is thinner than chipboard, but sturdier than cardstock. Perfect!


HAPPY NEW YEAR GIVEAWAY


Giveaway over at www.simonebartrum.com. Win a mini calendar project kit.


Want to make one of these for yourself?

I have three kits here to giveaway! Wooohooo.

To be in the running, just leave a comment below or on my Facebook page and make sure you’ve liked my FB page. I’ll be announcing the winners over there and will contact them (maybe you?) via Facebook. 


Spiral Flower Die Mini Calendar Magnet. From www.simonebartrum.com


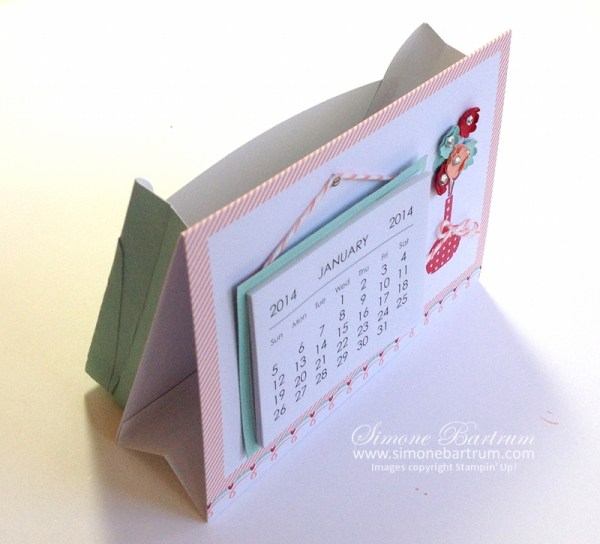
Still looking for ways to use up your leftover calendars? Check out the fun tutorial I shared in 2014. It shows you how to making a standing calendar from a folded card, and uses an envelope to make a 3D pocket on the back! That tutorial is HERE.

Calendar top side


Wishing you a very Happy New Year. Stay happy and safe, and I hope all your dreams for the coming year actually come true!

Don’t forget to leave a comment below and make sure you’ve liked my Facebook page to be in the running for the free calendar kits. 

Simone Bartrum, Stampin' Up! demonstrator Australia, Victoria


6 responses so far

DIY Project: Wicker Heart Christmas Ornament

Published by under cards | Dec 24 2015

Merry Christmas! I hope you’re calm and relaxed now with big ticks all over your To Do list.

If not, don’t stress. It’s time to focus on the fun times and memories in the making. They are the things that matter most. xxx

There’s just enough time to share a little gift I made recently for my Craft@Home Club members.

Merry Christmas - Wicker ornaments (from a bunting sold at Kmart), embellished with Stampin' Up! products. www.simonebartrum.com

In Kmart I found a garland of white hearts that were joined together with ribbon. Going by the sticker on the box, it is called a Wicker Heart Bunting.

I think there were 8 hearts in each box and they weren’t expensive at all. Only around $6-$10 for the whole box.

I ended up buying a few sets, and when I went back recently to get more they were sold out. But it’s ok! The helpful assistant I spoke to said they regularly get in more stock because this is a very popular item, so keep your eyes out next time you’re near a Kmart.

You could easily adapt this project for Valentines, wedding or even a new baby.

Ah, the possibilities.


HOW TO MAKE IT:

SNEAK PEEK ALERT! Hey, where did that ribbon come from? And what about that banner? Surprise! These are both brand new products from the upcoming Occasions catalogue! Check back on the 5th of January to view these products online, or ask me for a catalogue.
Wicker Heart Ornaments, made from a garland of woven wicker hearts from Kmart. See Wicker hearts ornament. For details visit https://simonebartrum.com/cards/diy-project-wicker-ornament/ for more info.

  1. Cut the ribbon to separate all the hearts.
  2. Add 20cm of the lovely new Pool Party glitter ribbon through the loop and tie a knot in the end. Attach a separate bow at the loop with hot glue gun.
  3. Using your Big Shot and the Christmas Greetings thinlits die, cut the word Merry from Silver Foil cardstock.
  4. IMG_0665Stamp the banner outline first (from Number of Years stamp set, available 5th Jan) and then the word Christmas from Holly Joly Greetings. I used Pool Party for both. 
  5. Finally, cut the shape with the banner framelit die from the Large Numbers Framelits dies (also avail from 5th Jan). Attach these to the heart with the hot glue gun. You can also use glue dots or your fave adhesive, but make sure it’s super strong.

Wicker Heart Ornament in half-size wood mount storage box, available from Stampin' Up!. More info at www.simonebartrum.com


 OPTIONAL

Put your heart ornament in a pretty presentation box.

They fit perfectly in the half-size wood mount stamp cases that are available in my store.


Wicker Heart Ornament in half-size wood mount storage box, available from Stampin' Up!. More info at www.simonebartrum.com


Wicker Heart Ornament in half-size wood mount storage box, available from Stampin' Up!. More info at www.simonebartrum.com

Wicker Heart Ornament in half-size wood mount storage box, available from Stampin' Up!. More info at www.simonebartrum.com

What is the Craft@Home Club?

I mentioned these were gifts for my Craft@Home Club members, and in case you’re wondering what that’s all about, I have the answers – and some exciting news.

Craft@Home Club is a virtual host club which I’ve been facilitating for 2 years now.

I pool the orders of members so together the orders qualify for Stampin’ Rewards (host benefits) – which is a credit for FREE product! Each month the members take turns for the freebies.

It’s an awesome program, but what makes it EVEN BETTER is that I send all members free happy mail each month…. in their letterbox, not the inbox!

They each get a handmade card and an Inspiration Pack with product samples, tutorials, little kits and more. We have members from all over Australia, and I have truly loved interacting with them and getting to know them online.

Want to join? From January 2016 I will have a small number of spots available so you can join from the comfort of home and start receiving happy mail too. Just email your interest and I’ll get you on to the VIP list.

Merry Christmas - Wicker ornaments (from a bunting sold at Kmart), embellished with Stampin' Up! products. www.simonebartrum.com


Merry Christmas - Wicker ornaments (from a bunting sold at Kmart), embellished with Stampin' Up! products. www.simonebartrum.com


Wishing my lovely blog visitors a beautiful festive season, and a fabulous day spent with family and friends or however you like to spend it.

We will have a pretty hot 30+ degree day here, so the air conditioner will be pumping as we enjoy our roast pork and turkey with all the trimmings. Love it. xxxWicker hearts ornament. All the info about this DIY project can be found at: https://simonebartrum.com/cards/diy-project-wicker-ornament/ Product List


PLUS…. The sneak peeks from the upcoming Occasions catalogue.

Stay tuned for more news about the new catalogue when it goes live on 5th January.

Don’t forget to check out the INCREDIBLE BARGAINS which are on NOW over in the store. Find it <HERE>


Happy stamping,

Simone Bartrum, Stampin' Up! demonstrator Australia, Victoria


One response so far

CTC 60 – CASE-ing The Crew

Published by under cards | Dec 13 2015

CASE-ing The Catty - Blog Hop

Each week the CASE-ing the Catty crew examine the Stampin’ Up! catalogue for inspiration. This week we are wrapping up our program for the year so we are doing something a little different – we are looking to each other for inspiration!

I’m thrilled to share two projects that were inspired by two very talented crafters.

The first of those is Alison Barclay from Gothdove Designs. I’ve been a fan of Alison’s work for some time, and love her clean and crisp style. If you have a scroll through her blog, you’ll know what I mean. I’ve been inspired by her work many times over the years, and her creations often pop up in my Pinterest feed.

In November Alison recreated the gorgeous project on page 15 of the Stampin’ Up! Holiday Catalogue and I was thrilled to see it because I loved the card and couldn’t quite work out how to make it. Thanks for the inspiration Alison, and for sharing how you made your card.

Here is Alison’s…

Embellished-Ornaments

And here is my version…

Embellished Ornaments

I kept it fairly close to Alison’s original, but swapped her blues (Tempting Turquoise and Island Indigo) for Blushing Bride and Blackberry Bliss.

It also gave me the chance to try out the fantastic new Wink of Stella pens which will be available though Stampin’ Up! in only a couple of weeks. Bring on that new Occasions Catalogue. Woohoo!!! The Wink of Stella pens have a brush tip and are perfect for applying a touch of shimmer and glimmer in just the right places. So convenient! I’m predicting this little item will be a huge seller in the new catalogue.

Embellished Ornaments meets Wink of Stella - Stampin' Up! CTC 60


I kept the Embellished Ornaments theme going with my second project, although this time I CASEd the very talented Helen from H2 Designs.

I was so inspired by a project she created back in September (for CTC #49) – the layout and the vellum just jumped right out at me.

Here is Helen’s card:

CTC49b

I used that project as inspiration for this one:


Embellished Ornaments stamp set by Stampin' Up! - Gold and navy. Created by Simone Bartrum for CTC 60.

Night of Navy and Gold is a favourite colour combo of mine this year. I even managed to sneak in some Night of Navy seam binding ribbon on this one.

Embellished Ornaments stamp set by Stampin' Up! - Gold and navy. Created by Simone Bartrum for CTC 60.

So there you have it!

A huge thanks to Alison and Helen for their inspirational projects, to our CTC Crew organiser Rebecca Scurr, and for everyone who shares their projects each week.

I hope you’ll join us as we look to the awesome new Occasions catalogue for inspiration when we return in January 2016.

Please continue on the hop. Next you’re off to Helen at H2 Designs.

CASE-ing the catty NEXT BLOG


Happy stamping,

Simone Bartrum, Stampin' Up! demonstrator Australia, Victoria


Don’t forget to check out the HUGE YEAR END SALE on now!


20 responses so far

  • This is me! Simone Bartrum, Australian Stampin' Up! demonstrator since 2007.
  • Simone Bartrum
    Australia
      0411 642 038

  • Welcome to my online home where I share a love of cardmaking, hand-crafted home decor and rubber stamping. Grab a cuppa and click around!

  • Would you like something you see here? 
    If you're in Australia, come browse my online store.

  • Questions or comments?

  • 2025
    Sales Award Top 10 AU
    Australian Top Performer
    Incentive Trip Achiever

  • 2024
    Sales Award Top 10 AU
    Incentive Trip Achiever
    Team Building Award


    2023
    Sales Award #11
    Team Building Award
    Leadership Award

  • 2022
    Sales Award #13
    Team Building Award
    Leadership Award

  • 2021
    Sales Award #15
    Team Building Award
    Leadership Award

  • 2020
    Australian Top 25
    Sales Award #5
    Incentive Trip

  • 2019
    Australian Top 25
    Sales Award #11
    Leadership Award

  • 2018
    Australian Top 10
    Incentive Trip Achiever
    Top 10 Sales & Recruiting

  • 2017
    Australian Top 10 #6
    Global Top 100
    Incentive Trip Achiever

  • 2016
    Australian Top 10
    Incentive Trip Achiever
    Leadership Award

  • 2015
    Incentive Trip Achiever
    $40K Sales Award
    Recruiting Award

  • 2014
    Leadership Award
    Recruiting Award
    Incentive Trip Achiever

  • 2013
    Leadership Award
    Incentive Trip Achiever
    Sales Achiever's Award

  • 2012
    #2 Leadership Award
    Incentive Trip Achiever
    #6 Demonstrator of Year

  • 2011
    #1 Leadership Award
    Incentive Trip Achiever
    #7 Demonstrator of Year

  • 2010
    #2 Leadership Award
    Incentive Trip Achiever
    #16 Demonstrator of Year

  • FREE TUTORIAL BUNDLE WITH $50 PURCHASE

  • Recent Posts

  • Meta

  • Stampin' Up! 2025-2026 Annual Catalogue
    6 May 2025 - 4 May 2026
    View Online | Shop Online
  • Join Stampin' Up!

  • Join to save money | Join to make money
  • Amazing places we've visited thanks to Stampin' Up!'s Incentive Trip program*

  • Mediterranean Cruise 2016
  • * Legal disclaimer: I have achieved the awards and recognition listed above, but this is not representative of typical Stampin’ Up! demonstrators. The level of sales to achieve this result requires significant work and is accomplished by a substantially small percentage of Stampin’ Up! demonstrators.


  • Popular Posts

  • The Fine Print

  • All content, including designs, concepts, text, and photographs are COPYRIGHT ©2026 Simone Bartrum, unless otherwise stated. I only use Stampin' Up!® products, so all stamped images are COPYRIGHT Stampin' Up!. As an independent demonstrator for Stampin' Up!, the content of this site is my responsibility. The use of and content of the classes, services, or products offered on here is not specifically endorsed by Stampin' Up!.