Thanks for hopping along with us today. We’re so pleased you’re joining us on the EurekaStampers ‘Easter Blog Hop’. You may be starting your journey here or you may have come from Tracy Penn’s page. Keep hopping around and you’ll see a fabulous range of Easter projects to get you inspired and crafting this weekend.
My project is an Easter basket with a twist. It’s made from clear Window Sheets and the Berry Basket Bigz die. Hmmm, being see-through presented a few photographing challenges, but hopefully you can see it ok here.

Want to see how the Berry Basket Bigz die works? Check out this video.
I used a slightly different method – glue dots instead of staples. The window sheets are just a little more difficult to work with, but only because it’s hard to see where to line it all up. Such a cool effect though! I’m so glad this is a Bigz die and not framelits. That means we can create our berry baskets out of all kinds of materials.
[Oooh – metal flashing would look amazing too… (brain ticking over)… that will have to be my next project.]
The base of the basket is lined with a 7.5cm x 7.5cm square of So Saffron cardstock. I then sliced up Pink Pirouette and So Saffron cardstock into teeny tiny thin strips. These were scrunched up and then used as ‘fill’ in the bottom of the clear berry basket.

The cute little paper pieced rabbit is from the Happy Easter Bunny single stamp, which you can find on page 35 of the Occasions catalogue.
He is attached to a skinny treat bag filled with Cadbury mini eggs. Don’t you love it when companies make products to match our cardstock and ink colours? 😉
Paper Piecing Technique: Easter Bunny
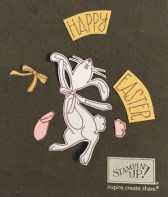 1. Stamp the bunny three times: one on white cardstock, one on Pink Pirouette, and one on So Saffron.
2. Carefully hand cut the entire bunny in white, the tummy and tail in pink and the neck ribbon in yellow (So Saffron). Use sharp tipped scissors like Stampin’ Up! paper snips.
3. Using a tiny bit of liquid multipurpose glue, layer the tummy and tail over the white bunny. Finally, adhere to neck ribbon to the bunny.

The “Happy” and “Easter” banners are attached as floating sentiments. They were adhered to a thin strip of window sheet, so they bounce slightly and almost look like they are floating. It’s a fun way to attach sentiments!

Mmmmm, chocolate. Yum.
I hope you enjoyed my projects today. Now don’t stop hopping! Keep on going and you will land on Lorinda deRegt-Penn’s blog with her gorgeous project. I was lucky enough to see it in person last week and I can tell you it is stunning!
NEXT STOP: Lorinda deRegt-Penn’s blog
If you get lost along the way, here’s a list of all stops on the blog hippity hop
Simone Bartrum <—– YOU ARE HERE
Lorinda De Regt-Penn
Jessica Williams
Carly Middleton
Rebecca Scurr
Rose Packer
Emma Palonek
Heather McCarthy
Tracy Penn
Thanks for joining us, and don’t forget to leave some comment love as you hop around. xxxxx
Happy stamping,